Table of Contents
What’s Wrong With My Hydrangea?
Hydrangeas are beloved garden staples, but they can occasionally present challenges that leave gardeners scratching their heads. Whether it’s a lack of blooms, leaf spots, or wilting leaves, identifying the problem is the first step to ensuring these beautiful shrubs thrive. This guide will address the most common hydrangea problems and their solutions so you can restore your plant to its full glory.
 Source: flickr.com; Author: ohi007; License: CC BY-NC-SA 2.0
Lack of Blooms
Hydrangeas are cherished for their vibrant and abundant blooms, which can be a highlight in any garden. However, it's not uncommon for gardeners to encounter issues where their hydrangeas fail to flower. Understanding the underlying causes of this problem is essential to restore the plant's blooming potential.
Improper Pruning
Pruning plays a crucial role in the blooming cycle of hydrangeas. Different species have varying blooming habits, and incorrect pruning can inadvertently remove the buds responsible for the next season's flowers.
- Old Wood Bloomers: Species such as Hydrangea macrophylla (Bigleaf Hydrangea) and Hydrangea quercifolia (Oakleaf Hydrangea) develop flower buds on old wood, meaning the previous year's growth. Pruning these plants in late winter or early spring can remove the flower buds, leading to a lack of blooms in the upcoming season.
- New Wood Bloomers: In contrast, species like Hydrangea paniculata (Panicle Hydrangea) and Hydrangea arborescens (Smooth Hydrangea) bloom on new wood, or the current season's growth. These can be pruned in late winter or early spring without affecting their blooming potential.
Solution: Identify the species of your hydrangea to determine its blooming habit. For old wood bloomers, prune immediately after flowering to avoid removing next year's buds. For new wood bloomers, prune in late winter or early spring before new growth begins.
Insufficient Sunlight
Light availability significantly influences hydrangea blooming. While these plants thrive in partial shade, inadequate sunlight can impede flower development.
- Light Requirements: Hydrangeas generally require at least 3-4 hours of sunlight daily. Too much shade can result in lush foliage but few or no blooms.
Solution: Ensure your hydrangea is planted in a location that receives sufficient light. If it's in deep shade, consider transplanting it to a spot with morning sun and afternoon shade to promote optimal blooming.
Excessive Nitrogen Fertilisation
While fertilisation supports plant growth, an imbalance, particularly an excess of nitrogen, can favour leaf development over flowering.
- Nitrogen's Role: Nitrogen promotes vegetative growth. High nitrogen levels can lead to vigorous leaf production at the expense of flowers.
Solution: Use a balanced fertiliser or one with a higher phosphorus content, which encourages flowering. Avoid over-fertilising and consider conducting a soil test to determine nutrient levels before application.
Water Stress
Hydrangeas require consistent moisture for optimal growth and blooming. Both drought and overwatering can cause stress, leading to reduced or absent flowering.
- Drought Stress: Lack of adequate water can cause the plant to conserve energy, reducing or eliminating blooms.
- Overwatering: Excess water can lead to root rot and other issues, hindering the plant's ability to produce flowers.
Solution: Maintain evenly moist, well-drained soil. Mulching can help retain soil moisture and regulate temperature. Adjust watering practices based on weather conditions to prevent both drought and waterlogging.
Winter Damage
Exposure to harsh winter conditions can damage or kill the buds of hydrangeas that bloom on old wood, resulting in a lack of flowers in the following season.
- Frost Damage: Late spring frosts can be particularly harmful, destroying developing buds.
Solution: Protect hydrangeas from extreme cold by covering them with burlap or frost cloths during late winter and early spring. Planting in sheltered locations can also mitigate frost damage.
Plant Maturity
Young hydrangeas may not bloom immediately, as they require time to establish and mature before producing flowers.
- Establishment Period: It can take several years for a hydrangea to mature enough to bloom, especially if grown from cuttings.
Solution: Be patient with young plants. Ensure they are healthy and provide optimal growing conditions to encourage blooming as they mature.
Addressing the causes of bloom failure can restore the beauty of your hydrangeas. By identifying issues such as pruning errors, light deficiencies, or nutrient imbalances, you can enjoy vibrant, flowering plants in your garden for years to come.
Common Causes of Leaf Spots
Common Causes of Leaf Spots
Leaf spots on hydrangeas can result from various factors, primarily fungal infections, bacterial diseases, and environmental conditions.
Fungal Infections
Several fungal pathogens can cause leaf spots on hydrangeas:
- Cercospora Leaf Spot: This common fungal disease manifests as small, circular purple or brown spots on the lower leaves, gradually spreading upward. Severe infections can lead to premature leaf drop and reduced plant vigour.
- Anthracnose: Caused by the fungus Colletotrichum, anthracnose presents as large, irregular brown spots with lighter centres. It can affect both leaves and flowers, leading to significant aesthetic damage.
- Powdery Mildew: Identified by a white, powdery substance on the upper leaf surfaces, this fungal infection thrives in humid conditions and can cause leaf distortion and premature leaf drop.
Bacterial Diseases
Bacterial leaf spot, caused by Xanthomonas species, leads to angular, water-soaked spots that eventually turn brown or black. This disease often occurs in warm, wet conditions and can cause significant defoliation if not managed properly.
Environmental Factors
Non-pathogenic factors can also contribute to leaf spots:
- Sunscald: Exposure to intense sunlight can cause leaf scorch, leading to brown spots or edges, especially in hydrangeas that prefer partial shade.
- Water Stress: Both overwatering and underwatering can stress hydrangeas, resulting in leaf spots or yellowing. Ensuring consistent moisture without waterlogging is crucial.
- Nutrient Deficiencies: Lack of essential nutrients, particularly iron, can cause chlorosis, where leaves turn yellow with green veins, sometimes accompanied by brown spots.
Management and Prevention
Addressing leaf spots involves a combination of cultural practices, environmental adjustments, and, when necessary, chemical treatments.
Cultural Practices
- Proper Watering: Water at the base of the plant to avoid wetting the foliage, as moisture on leaves can promote fungal growth. Morning watering allows leaves to dry throughout the day.
- Sanitation: Regularly remove and dispose of fallen leaves and debris to reduce sources of infection. Prune affected leaves to prevent the spread of pathogens.
- Air Circulation: Ensure adequate spacing between plants and prune to improve airflow, reducing humidity around the foliage.
Environmental Adjustments
- Optimal Planting Location: Plant hydrangeas in locations that receive appropriate light conditions for the specific variety, typically partial shade, to prevent sunscald.
- Soil Management: Maintain well-draining soil rich in organic matter. Conduct soil tests to identify and amend nutrient deficiencies.
Chemical Treatments
- Fungicides: In cases of severe fungal infections, apply appropriate fungicides following label instructions. Early intervention is key for effectiveness.
- Bactericides: For bacterial leaf spots, copper-based bactericides can be effective when applied promptly.
Leaf spots on hydrangeas can arise from various causes, including fungal and bacterial infections, as well as environmental stresses. By implementing proper cultural practices, ensuring optimal growing conditions, and applying treatments when necessary, gardeners can maintain the health and beauty of their hydrangeas.
Common Causes of Wilting in Hydrangeas
Several factors can lead to hydrangea wilting, including water stress, environmental conditions, and improper care practices.
Water Stress
Hydrangeas require consistent moisture to thrive. Both overwatering and underwatering can cause wilting.
- Underwatering: Dry soil can lead to dehydration, causing the plant to wilt. Regular watering is essential, especially during hot weather.
- Overwatering: Excessive moisture can lead to root rot, hindering the plant's ability to absorb water and nutrients, resulting in wilting.
Solution: Maintain evenly moist, well-drained soil. Water deeply at the base of the plant, allowing the top inch of soil to dry out between waterings. Mulching can help retain soil moisture and regulate temperature.
Environmental Factors
External conditions can also contribute to hydrangea wilting.
- Excessive Sun Exposure: Hydrangeas prefer partial shade. Prolonged exposure to intense sunlight, especially during the hottest part of the day, can cause wilting.
- High Temperatures: Extreme heat increases transpiration rates, leading to water loss and wilting.
Solution: Plant hydrangeas in locations with morning sun and afternoon shade. During heatwaves, provide temporary shade and ensure adequate watering to mitigate wilting.
Improper Pruning
Incorrect pruning can weaken hydrangeas, making them more susceptible to wilting.
- Timing: Pruning at the wrong time can remove flower buds and reduce the plant's vigour.
- Technique: Over-pruning can stress the plant, leading to wilting.
Solution: Understand the specific pruning requirements of your hydrangea species. Generally, prune after flowering and avoid cutting back too severely.
Soil Conditions
Soil quality directly affects hydrangea health.
- Poor Drainage: Heavy, waterlogged soils can suffocate roots, leading to wilting.
- Nutrient Deficiencies: Lack of essential nutrients can weaken the plant, causing drooping leaves and stems.
Solution: Ensure soil is well-draining and rich in organic matter. Conduct a soil test to identify and amend nutrient deficiencies.
Heavy Flower Heads
Large, dense blooms can cause branches to droop under their weight.
- Bloom Size: Some hydrangea varieties produce large flower heads that can weigh down branches, leading to drooping.
Solution: Provide support to branches with heavy blooms using stakes or cages. Pruning to reduce bloom size can also help manage drooping.
Wilting or drooping in hydrangeas can result from various factors, including water stress, environmental conditions, improper pruning, soil issues, and heavy blooms. By identifying and addressing the specific cause, you can restore your hydrangeas to their full, vibrant glory.
Common Causes of Leaf Discolouration
Discoloured leaves in hydrangeas can result from various factors, including nutrient deficiencies, fungal infections, environmental stresses, and viral diseases.
Nutrient Deficiencies
Hydrangeas require a balanced supply of nutrients to maintain healthy green foliage. Deficiencies can lead to specific discolouration patterns:
- Iron Deficiency (Iron Chlorosis): Yellowing occurs between the leaf veins, which remain green, primarily affecting young leaves. This condition is often due to high soil pH levels that limit iron availability.
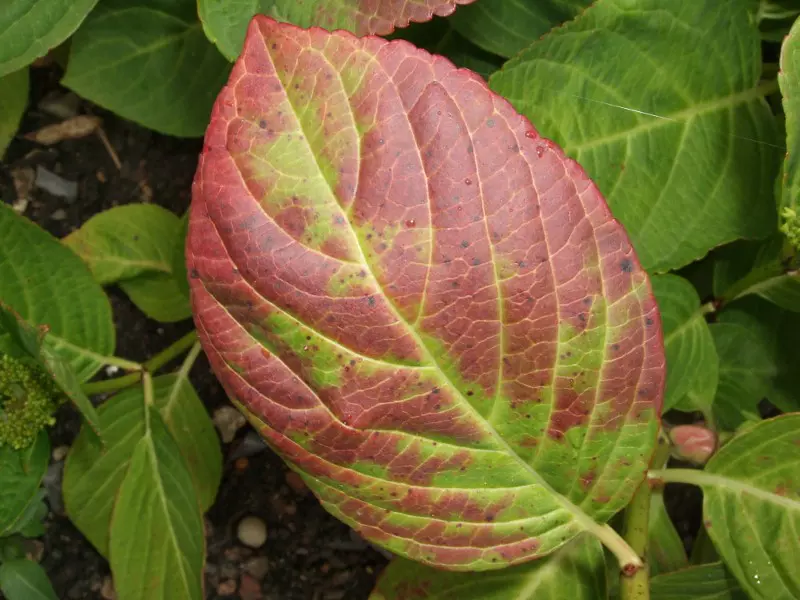
- Phosphorus Deficiency: Leaves may develop a purplish hue, especially under cool weather conditions. This can be exacerbated by acidic soils that bind phosphorus, making it unavailable to plants.
Solution: Conduct a soil test to determine pH and nutrient levels. Adjust soil pH to appropriate levels (typically 5.5 to 6.5 for hydrangeas) and apply fertilisers rich in the deficient nutrients as needed.
Fungal Infections
Fungal diseases can cause various leaf discolourations in hydrangeas:
- Cercospora Leaf Spot: Manifests as small purple or brown spots on lower leaves, which can enlarge and cause leaf yellowing and drop.
- Powdery Mildew: Characterised by a white, powdery coating on leaves, leading to yellowing and distortion.
- Anthracnose: Presents as large, irregular brown spots, potentially affecting both leaves and flowers.
Solution: Improve air circulation around plants by proper spacing and pruning. Avoid overhead watering to reduce leaf wetness. In severe cases, apply appropriate fungicides following label instructions.
Environmental Stresses
Adverse environmental conditions can lead to leaf discolouration:
- Sunscald: Excessive direct sunlight can cause leaf scorch, resulting in brown or yellow patches.
- Water Stress: Both overwatering and drought can cause leaves to yellow or brown due to root stress.
- Cold Damage: Exposure to frost or sudden temperature drops can lead to leaf browning or blackening.
Solution: Plant hydrangeas in locations with appropriate light conditions, typically partial shade. Ensure consistent watering practices, keeping soil moist but not waterlogged. Protect plants from extreme temperatures with mulching and, if necessary, coverings during cold snaps.
Viral Diseases
Although less common, viral infections like Hydrangea Ringspot Virus can cause discoloured, ring-shaped spots on leaves, leading to reduced plant vigour.
Solution: There are no cures for viral infections in plants. Remove and destroy affected plants to prevent the spread to healthy specimens. Practice good sanitation by sterilising tools and avoiding working with wet plants.
Discoloured leaves in hydrangeas can result from a variety of factors, including nutrient deficiencies, fungal infections, environmental stresses, and viral diseases. Identifying the specific cause is essential for implementing effective solutions to restore your hydrangeas' health and beauty.
Consequences of Improper Pruning
Incorrect pruning can lead to several issues:
- Reduced or Absent Blooms: Pruning at the wrong time can remove flower buds, resulting in a lack of blooms in the following season.
- Weakened Plant Structure: Over-pruning or improper cuts can weaken the plant, making it susceptible to diseases and environmental stress.
- Increased Susceptibility to Disease: Improper pruning can create open wounds, providing entry points for pathogens.
Understanding Hydrangea Blooming Habits
Hydrangeas bloom on either old wood (previous year's growth) or new wood (current year's growth). Identifying your hydrangea type is crucial for proper pruning:
- Old Wood Bloomers: Includes Bigleaf (Hydrangea macrophylla), Oakleaf (Hydrangea quercifolia), and Climbing Hydrangeas (Hydrangea anomala subsp. petiolaris). These set buds in late summer to early autumn for the next year's blooms.
- New Wood Bloomers: Includes Panicle (Hydrangea paniculata) and Smooth Hydrangeas (Hydrangea arborescens). These develop buds on new growth in the spring and bloom in the same season.
Proper Pruning Techniques
Timing
- Old Wood Bloomers: Prune immediately after flowering, typically in late summer, to avoid removing next year's buds.
- New Wood Bloomers: Prune in late winter or early spring before new growth begins, as they bloom on current year's growth.
Pruning Steps
- Sanitise Tools: Ensure pruning shears are clean and sharp to prevent disease transmission.
- Remove Dead or Diseased Wood: Cut back any dead, damaged, or diseased stems to healthy tissue.
- Shape the Plant: For old wood bloomers, remove a few of the oldest stems at the base to encourage new growth. For new wood bloomers, cut back stems to a pair of healthy buds to promote vigorous blooming.
- Avoid Over-Pruning: Do not remove more than one-third of the plant at a time to reduce stress.
Common Mistakes to Avoid
- Pruning at the Wrong Time: Cutting back old wood bloomers in late winter or spring removes flower buds, leading to a lack of blooms.
- Cutting Too Severely: Drastic pruning can shock the plant and inhibit growth.
- Ignoring Plant Type: Applying the same pruning method to all hydrangeas without considering their blooming habits can result in poor performance.
Proper pruning is essential for maintaining the health and beauty of your hydrangeas. By understanding their blooming habits and following appropriate pruning techniques, you can ensure a vibrant display of flowers season after season.
Pest Infestations
Several pests are known to infest hydrangeas, including:
- Aphids: Small, soft-bodied insects that cluster on new growth, sucking sap and excreting honeydew, which can lead to sooty mould.
- Slugs and Snails: Molluscs that feed on young hydrangea leaves and stems, leaving irregular holes and silvery trails.
- Hydrangea Scale (Pulvinaria hydrangeae): Sap-sucking insects that attach to stems and the underside of leaves, appearing as white, waxy clusters.
- Spider Mites: Microscopic arachnids that cause stippling on leaves, leading to a bronzed appearance and potential leaf drop.
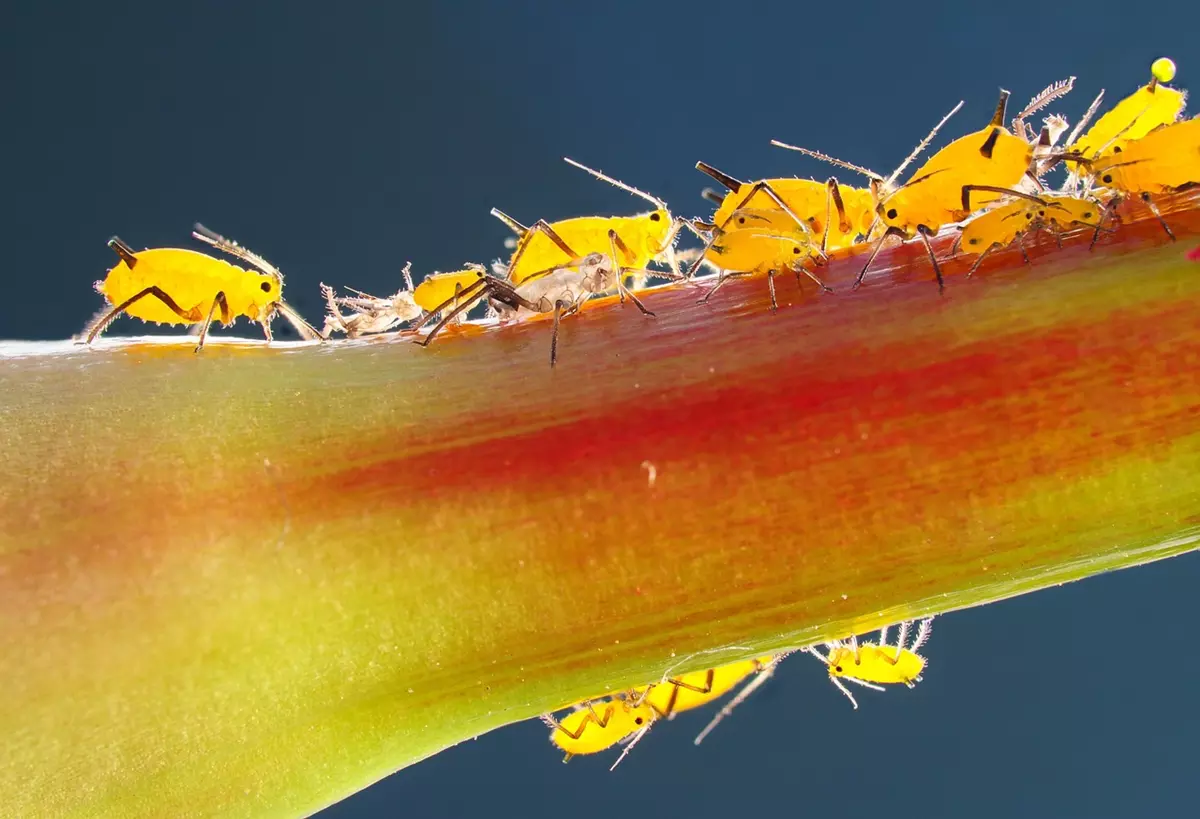 Aphids on the plant - Source: pixabay.com; Author: adege; License: Pixabay Content License
Identification and Symptoms
Recognising pest infestations early is crucial:
- Aphids: Look for clusters on tender shoots and the presence of sticky honeydew.
- Slugs and Snails: Identify by irregular holes in foliage and slime trails, especially after damp conditions.
- Hydrangea Scale: Notice white, cottony masses on stems and leaf undersides, leading to yellowing and leaf drop.
- Spider Mites: Detect fine webbing and a speckled or bronzed appearance on leaves.
Management Strategies
Cultural Controls
- Proper Spacing: Ensure adequate spacing between plants to improve air circulation, reducing humidity that favours pests.
- Regular Monitoring: Inspect plants frequently, especially new growth, for early signs of infestation.
- Watering Practices: Water at the base of the plant to keep foliage dry, deterring pests like aphids and spider mites.
Mechanical Controls
- Handpicking: Manually remove visible pests such as slugs, snails, and aphids.
- Pruning: Trim and dispose of heavily infested plant parts to reduce pest populations.
Biological Controls
- Encourage Beneficial Insects: Attract natural predators like ladybirds and lacewings that feed on aphids and spider mites.
- Nematodes: Apply beneficial nematodes to control slug and snail populations.
Chemical Controls
Use chemical interventions as a last resort:
- Insecticidal Soaps: Effective against soft-bodied insects like aphids; apply according to label instructions.
- Horticultural Oils: Useful for controlling scale insects; ensure thorough coverage of affected areas.
- Avoid Broad-Spectrum Insecticides: These can harm beneficial insects and disrupt the ecosystem.
Preventative Measures
- Maintain Plant Health: Healthy plants are more resilient to pest infestations; provide appropriate water, nutrients, and light conditions.
- Mulching: Use organic mulch to conserve soil moisture and deter pests like slugs and snails.
- Sanitation: Remove plant debris and weeds that can harbour pests.
Effective management of pest infestations in hydrangeas involves early identification, implementing cultural and mechanical controls, and resorting to chemical treatments only when necessary. By maintaining plant health and monitoring regularly, you can enjoy the full beauty of your hydrangeas.
Soil pH Issues
The Role of Soil pH in Hydrangea Flower Colour
Soil pH measures the acidity or alkalinity of the soil, on a scale from 0 to 14, with 7 being neutral. Hydrangeas, particularly the Hydrangea macrophylla species, exhibit colour changes based on soil pH due to the availability of aluminium ions:
- Acidic Soils (pH below 7): In acidic conditions, aluminium ions are more available, leading to blue or purple flowers.
- Neutral to Alkaline Soils (pH 7 and above): In these soils, aluminium ions are less available, resulting in pink or red flowers.
It's important to note that white hydrangea varieties typically remain unaffected by soil pH changes and retain their colour regardless of the soil's acidity or alkalinity.
Testing and Adjusting Soil pH
Testing Soil pH
Before attempting to alter soil pH, it's crucial to determine its current level. Soil testing kits are widely available and provide a straightforward method to assess pH. For more accurate results, consider sending a soil sample to a local agricultural extension service.
Lowering Soil pH (Making Soil More Acidic)
To encourage blue hydrangea blooms, you may need to acidify your soil:
- Elemental Sulphur: Applying elemental sulphur is a common method to lower soil pH. Soil organisms convert sulphur into sulphuric acid, thereby acidifying the soil. The amount required depends on soil type and initial pH levels.
- Organic Mulches: Using organic materials like pine needles or composted oak leaves as mulch can gradually acidify the soil over time.
Raising Soil pH (Making Soil More Alkaline)
To promote pink hydrangea blooms, increasing soil pH may be necessary:
- Garden Lime: Incorporating lime into the soil can raise pH levels, reducing aluminium availability and encouraging pink flowers.
- Phosphorus-Rich Fertilisers: Applying fertilisers high in phosphorus can inhibit aluminium uptake, supporting pink coloration.
When making adjustments, it's advisable to proceed gradually and retest the soil periodically to monitor changes. This approach helps prevent over-adjustment, which can adversely affect plant health.
Impact of Soil pH on Hydrangea Health
Beyond influencing flower colour, soil pH affects nutrient availability, which is vital for hydrangea health:
- Iron Availability: In highly acidic soils, iron becomes more soluble, potentially leading to toxicity. Conversely, in alkaline soils, iron becomes less available, possibly causing deficiencies and resulting in chlorosis (yellowing of leaves).
- Phosphorus Availability: Extremely acidic or alkaline soils can limit phosphorus availability, essential for energy transfer and photosynthesis in plants.
Maintaining a balanced soil pH ensures optimal nutrient uptake, promoting robust growth and abundant blooms.
Understanding the relationship between soil pH and hydrangea flower colour empowers gardeners to achieve desired bloom hues and maintain plant vitality. Regular soil testing and mindful adjustments allow for informed decisions, ensuring that hydrangeas remain a vibrant focal point in any garden.
About the Author

Richard Seres-Nagy is a passionate gardener with over 20 years of experience in hydrangea care. He founded Hydrangea Library to share expert advice, step-by-step guides, and practical tips for fellow gardening enthusiasts.
Read More
