The Ultimate Guide to Hydrangea aspera (Rough-leaved hydrangea)

Table of Contents

About Hydrangea aspera

Hydrangea aspera, commonly known as the rough-leaved hydrangea, is a striking and unique shrub that adds a bold statement to gardens. Known for its large, velvety leaves and distinctive lacecap flowers, this hydrangea species is perfect for gardeners looking to create a lush, tropical-inspired aesthetic. This guide provides an overview of its origins, care requirements, and popular varieties to help you decide if it’s the right choice for your garden.

Origins of Hydrangea aspera

Native to the Himalayan region, parts of China, and Southeast Asia, Hydrangea aspera thrives in temperate climates with high humidity and consistent rainfall. It has been cultivated in gardens worldwide for its distinctive appearance and ability to grow in shaded environments.
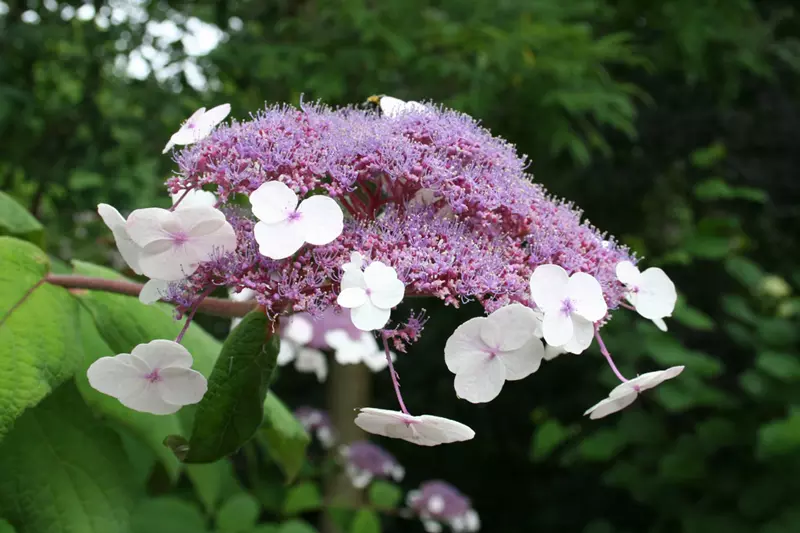
Hydrangea aspera flower
Hydrangea aspera ssp. sargentiana (China: Hupeh) plant, picture taken at the Zoo in Cologne, Germany on July, 7th, 2007. - By I, Mutante, CC BY-SA 3.0, Link

Characteristics of Hydrangea aspera

The rough-leaved hydrangea stands out among other species for its dramatic foliage and flowers. Here are its key features:

  • Leaves: Large, elongated, and velvety to the touch, these leaves add a tropical feel to the plant. They can grow up to 30 cm long.
  • Flowers: Lacecap flower heads consist of small fertile blooms surrounded by showy, sterile florets. Colours range from blue and purple to soft pink, depending on soil pH.
  • Height and Spread: This species can reach 2–3 metres in height and width, making it a substantial addition to any garden.
  • Growth Habit: Deciduous with a bushy, spreading form.
  • Bark: Mature plants feature peeling bark that adds winter interest to the garden.

Growing Requirements

While Hydrangea aspera is relatively easy to grow, it requires specific conditions to thrive:

1. Light

Prefers partial shade, making it ideal for woodland gardens or shaded borders. Avoid full sun in hot climates to prevent leaf scorch.

2. Soil

Thrives in fertile, well-draining soil with a slightly acidic to neutral pH (5.5–7). Enrich the soil with compost or organic matter for optimal growth.

3. Water

Requires consistent moisture, particularly during dry periods. Ensure the soil remains damp but not waterlogged.

4. Climate

Hardy in USDA zones 7–9, Hydrangea aspera performs well in temperate climates with mild winters and moist summers.

Who Should Grow Hydrangea aspera?

Hydrangea aspera is an excellent choice for:

  • Large Gardens: Its size and spreading habit make it a dramatic focal point in expansive landscapes.
  • Shaded Areas: Perfect for adding colour and texture to partially shaded or dappled light locations.
  • Woodland Gardens: Complements other shade-loving plants such as ferns, hostas, and hellebores.
  • Gardeners Seeking Unique Foliage: Its velvety leaves and peeling bark offer year-round interest.

Popular Varieties

Several varieties of Hydrangea aspera are available, each with unique characteristics. Here are some of the most popular:

1. ‘Macrophylla’

Known for its exceptionally large leaves and blue or purple lacecap flowers, this variety is perfect for creating a bold, tropical look.

2. ‘Villosa’

Features smaller leaves and clusters of lavender and mauve flowers, adding a refined touch to woodland gardens.

3. ‘Sargentiana’

A striking cultivar with soft, velvety foliage and large, lilac-pink flower heads. Its peeling bark adds winter interest.

4. ‘Hot Chocolate’

Offers dark, chocolate-coloured stems and vibrant purple flowers, creating a dramatic contrast in the garden.

Care Tips

To keep your Hydrangea aspera healthy and vibrant, follow these care guidelines:

  • Mulch: Apply a 5–8 cm layer of organic mulch around the base to retain moisture and regulate soil temperature.
  • Water Regularly: Keep the soil consistently moist, particularly during dry spells.
  • Fertilise: Use a balanced, slow-release fertiliser in spring to support growth and flowering.
  • Prune Sparingly: Remove dead wood and spent flowers in late winter or early spring. Avoid heavy pruning, as this may reduce blooms.
  • Protect from Frost: In colder regions, apply a thick mulch layer in autumn to protect the roots during winter.

Hydrangea aspera is a bold and distinctive shrub that brings unique charm to shaded gardens and woodland landscapes. Its dramatic foliage, showy lacecap flowers, and peeling bark make it an excellent choice for gardeners seeking something extraordinary. With proper care and the right conditions, this stunning hydrangea will thrive and become a standout feature in your garden.

How to plant Hydrangea aspera

Hydrangea aspera, or the rough-leaved hydrangea, is a stunning addition to any garden with its large, velvety leaves and distinctive lacecap flowers. Proper planting is key to ensuring this shrub establishes well and thrives in its new home. This guide outlines the essential steps for planting Hydrangea aspera to maximise its health and beauty.

Preparing for Planting

Before planting, take time to prepare both the plant and its new location to ensure success:

1. Select the Right Spot

Hydrangea aspera prefers partial shade or dappled sunlight. Choose a location with:

  • Well-Draining Soil: The soil should retain moisture without becoming waterlogged.
  • Protection: Shelter from strong winds, which can damage its large leaves.
  • Space: Allow ample room for the plant to reach its mature size of 2–3 metres in height and spread.

2. Gather Materials

Have these tools and materials ready:

  • Spade or shovel
  • A bucket large enough to submerge the plant’s pot
  • Compost or well-rotted manure
  • Mulch (e.g., bark chips or leaf mould)
  • Watering can or hose

Step-by-Step Planting Guide

Follow these steps to plant Hydrangea aspera successfully:

1. Hydrate the Root Ball

  1. Fill a Bucket: Fill a bucket with water deep enough to submerge the plant’s pot completely.
  2. Submerge the Pot: Place the potted hydrangea into the water. Gently press it down to ensure it is fully submerged.
  3. Wait for Bubbles: Hold the pot under water until air bubbles stop rising, typically 1–2 minutes. This ensures the root ball absorbs enough moisture.
  4. Drain Excess Water: Remove the pot and allow it to drain for a minute before proceeding.

2. Dig the Planting Hole

  1. Size the Hole: Dig a hole twice as wide and slightly deeper than the plant’s root ball.
  2. Enrich the Soil: Mix compost or organic matter into the excavated soil to improve fertility and drainage.

3. Position the Plant

  1. Remove the Pot: Carefully slide the plant out of its pot without disturbing the roots.
  2. Place in the Hole: Position the plant so the top of the root ball is level with the surrounding soil.

4. Backfill and Firm the Soil

  1. Fill the Hole: Refill the hole with the enriched soil, pressing down lightly to remove air pockets.
  2. Firm the Soil: Gently tamp the soil around the base of the plant using your hands or feet to ensure contact between roots and soil.

5. Water Thoroughly

Water the plant generously after planting to help the soil settle and provide essential moisture for the roots.

6. Apply Mulch

Spread a 5–8 cm layer of organic mulch around the base of the plant, keeping it 5 cm away from the stem. Mulch retains soil moisture and regulates temperature.

Aftercare Tips

Proper aftercare is essential to help your hydrangea establish and thrive:

  • Water Regularly: Keep the soil consistently moist, particularly during the first few weeks after planting.
  • Fertilise in Spring: Apply a balanced fertiliser in early spring to encourage healthy growth and flowering.
  • Monitor for Pests: Check regularly for signs of pests or diseases, and take prompt action if issues arise.
  • Prune Sparingly: Remove dead or damaged stems in late winter or early spring to shape the plant.

Common Mistakes to Avoid

Avoid these common pitfalls when planting Hydrangea aspera:

  • Planting Too Deep: Ensure the root ball sits level with the surrounding soil to prevent rot.
  • Skipping Hydration: Neglecting to soak the root ball can lead to transplant shock and poor establishment.
  • Overwatering: Excessive watering can cause root rot. Maintain consistent but not saturated soil moisture.
  • Ignoring Mulch: Failing to apply mulch can lead to water loss and fluctuating soil temperatures.

Planting Hydrangea aspera correctly is essential for its health and beauty. By hydrating the root ball, preparing the soil, and following these step-by-step instructions, you can give your hydrangea the best start. With proper care and attention, this striking shrub will thrive in your garden, providing lush foliage and stunning blooms for years to come.

How to Prune Hydrangea aspera

The Rough-leaved hydrangea is a stunning shrub known for its velvety foliage and delicate lacecap flowers. Proper pruning is essential for maintaining its shape, promoting healthy growth, and encouraging vibrant blooms. This guide explains the best timing and techniques for pruning Hydrangea aspera to help it thrive.

When to Prune Hydrangea aspera

Timing is critical when pruning Hydrangea aspera. To ensure optimal results, follow these guidelines:

1. Prune in Spring

  • Earliest Time: Wait until the risk of frost has passed, typically in March or early April.
  • Why Spring: Pruning in spring allows you to assess any winter damage and avoid removing buds that may flower later in the season.

2. Avoid Autumn Pruning

Pruning in autumn is not recommended for Hydrangea aspera. Here’s why:

  • Protects Buds: The unpruned stems and flower heads act as natural insulation, shielding the plant from frost damage.
  • Allows Recovery: If frost damage occurs during winter, the plant retains enough stems to regrow in spring.

Step-by-Step Pruning Guide

Follow these steps to prune your Hydrangea aspera effectively:

1. Gather Your Tools

  • Sharp pruning shears or secateurs
  • Gloves to protect your hands
  • Rubbing alcohol for tool sterilisation

2. Inspect the Plant

Examine the hydrangea for dead, damaged, or frost-affected branches. This initial inspection helps you determine what needs to be removed.

3. Remove Dead and Damaged Wood

Use sharp pruning shears to cut back any dead or damaged branches to healthy wood. Make clean, angled cuts to prevent water from pooling on the cut surface.

4. Shape the Plant

Lightly trim the hydrangea to maintain its natural, bushy shape. Avoid excessive pruning to preserve the plant’s size and flowering potential.

5. Thin Out Dense Growth

Remove a few interior stems if the plant is overly dense. This improves airflow and light penetration, reducing the risk of fungal diseases.

Pruning Tips and Best Practices

Keep these tips in mind for successful pruning:

  • Disinfect Tools: Clean your tools with rubbing alcohol before and after pruning to prevent the spread of disease.
  • Prune Conservatively: Avoid cutting back too much, as Hydrangea aspera relies on its older stems for support and growth.
  • Mulch After Pruning: Apply a layer of organic mulch around the base to retain moisture and regulate soil temperature.
  • Monitor Growth: Check the plant regularly for signs of pests or diseases and address them promptly.

Common Mistakes to Avoid

Avoid these common errors when pruning Hydrangea aspera:

  • Pruning Too Early: Cutting back before the frost has passed can expose the plant to damage.
  • Over-Pruning: Removing too much wood can weaken the plant and reduce flowering.
  • Ignoring Dead Wood: Failing to remove dead or damaged branches can lead to pest and disease problems.

Pruning Hydrangea aspera at the right time and with the proper techniques is essential for maintaining its health and beauty. By waiting until spring and focusing on light, strategic cuts, you can protect your plant from frost damage and ensure lush, vibrant growth. With consistent care and attention, your rough-leaved hydrangea will continue to be a standout feature in your garden.

Soil and Hydrangea aspera

Hydrangea aspera, also known as rough-leaved hydrangea, is a striking shrub with large, velvety leaves and distinctive lacecap flowers. For this plant to thrive, it’s crucial to provide the right soil conditions. This guide explores the ideal soil requirements for Hydrangea aspera, highlighting the role of mulching in maintaining soil health and supporting growth.

Ideal Soil Conditions for Hydrangea aspera

Hydrangea aspera is relatively adaptable but performs best in well-prepared soil. Here are its key requirements:

1. Soil Type

The ideal soil for rough-leaved hydrangea is:

  • Well-Draining: Prevents waterlogging, which can cause root rot.
  • Moist: Retains enough water to keep the roots hydrated without becoming saturated.
  • Rich in Organic Matter: Provides essential nutrients for growth and enhances soil texture.

2. Soil pH

The soil pH affects the plant's overall health and flower colour:

  • Slightly Acidic to Neutral: A pH between 5.5 and 7 is ideal for healthy growth and vibrant foliage.

3. Nutrient-Rich

Enrich the soil with compost or well-rotted manure before planting to provide a strong nutrient base.

The Importance of Mulching

Mulching is a vital practice for maintaining healthy soil and ensuring the success of Hydrangea aspera. Here’s why mulching is essential:

Benefits of Mulching

  • Moisture Retention: Helps the soil retain water, reducing the frequency of watering, especially in warmer months.
  • Temperature Regulation: Protects the roots by keeping the soil cool in summer and insulating it during winter.
  • Weed Suppression: Minimises competition for nutrients and water by preventing weed growth.
  • Soil Enrichment: Organic mulch decomposes over time, adding essential nutrients to the soil.

How to Mulch

  1. Select Organic Mulch: Use bark chips, leaf mould, or straw for the best results.
  2. Apply Generously: Spread a 5–8 cm layer around the base of the plant, ensuring it doesn’t touch the stems to prevent rot.
  3. Refresh Annually: Replace or top up the mulch each spring to maintain its effectiveness.

Preparing Soil for Planting

Proper preparation ensures your hydrangea establishes well:

1. Test the Soil

Use a soil test kit to check pH and nutrient levels. Adjust the pH with sulphur to increase acidity or lime to reduce it, if needed.

2. Amend with Organic Matter

Mix compost, well-rotted manure, or leaf mould into the soil to improve fertility and drainage.

3. Loosen the Soil

Break up compacted soil to a depth of 30–40 cm to allow roots to spread easily and absorb nutrients.

Long-Term Soil Maintenance

Keeping the soil healthy over time ensures the success of Hydrangea aspera. Follow these practices:

  • Water Consistently: Maintain moist but well-drained soil, particularly during dry spells.
  • Fertilise Annually: Apply a slow-release fertiliser in early spring to support growth and flowering.
  • Monitor pH Levels: Test the soil every 1–2 years and adjust the pH as needed to keep it in the optimal range.
  • Aerate Periodically: Loosen the soil around the base of the plant to improve air and water penetration.

Common Soil Problems and Solutions

Address these common issues to maintain soil health:

1. Poor Drainage

Symptoms: Yellowing leaves and stunted growth due to waterlogged roots.

Solution: Amend the soil with sand or perlite to improve drainage, or plant in a raised bed.

2. Nutrient Deficiency

Symptoms: Pale or discoloured leaves, weak stems, and reduced flowering.

Solution: Apply a balanced fertiliser and add organic matter to enrich the soil.

Providing the right soil conditions and incorporating mulching into your care routine are essential for the health and success of Hydrangea aspera. By preparing the soil, maintaining its quality, and applying mulch regularly, you can ensure this beautiful shrub thrives and enhances your garden for years to come.

Propagation Methods for Hydrangea aspera

The Hydrangea aspera is a striking addition to any garden with its velvety leaves and lacecap flowers. Propagation allows gardeners to expand their collection or share this unique shrub with others. This guide explores the most effective methods for propagating Hydrangea aspera, including cuttings, layering, and seed propagation.

Why Propagate Hydrangea aspera?

Propagation is a rewarding way to grow new plants and offers several benefits:

  • Cost-Effective: Create new plants without purchasing additional specimens.
  • Preservation: Maintain a favourite variety or expand its presence in your garden.
  • Personalisation: Select and grow plants best suited to your garden’s conditions.

Propagation Methods

Hydrangea aspera can be propagated using a variety of methods. Below are the most effective techniques:

1. Propagation by Cuttings

Taking cuttings is a reliable way to produce new plants quickly and efficiently.

Steps for Propagating from Cuttings

  1. Select Healthy Growth: Choose a semi-hardwood stem from the current season’s growth, ideally in late summer.
  2. Prepare the Cutting: Cut a 10–15 cm section just below a leaf node. Remove the lower leaves, leaving two or three pairs at the top.
  3. Apply Rooting Hormone: Dip the cut end into rooting hormone to encourage root development.
  4. Plant the Cutting: Insert the cutting into a pot filled with a mix of compost and sand for drainage.
  5. Cover for Humidity: Use a plastic bag or propagation dome to maintain high humidity around the cutting.
  6. Place in Indirect Light: Keep the cutting in a bright location, out of direct sunlight.
  7. Water Regularly: Keep the soil moist but not soggy. Roots should develop within 6–8 weeks.

2. Propagation by Layering

Layering allows the plant to develop roots while still attached to the parent, making it a low-risk method.

Steps for Propagating by Layering

  1. Select a Low Branch: Choose a flexible branch that can be bent to the ground without breaking.
  2. Prepare the Soil: Loosen the soil where the branch will be buried and enrich it with compost.
  3. Wound the Stem: Gently scrape the underside of the branch to expose the cambium layer, which promotes rooting.
  4. Bury the Branch: Secure the wounded section under the soil with a U-shaped pin or small rock, leaving the tip exposed.
  5. Water Consistently: Keep the soil moist. Roots should form within a few months.
  6. Transplant: Once the branch has rooted, cut it from the parent plant and move it to its new location.

3. Propagation by Seeds

Growing Hydrangea aspera from seeds is less common but possible for those with patience.

Steps for Propagating by Seeds

  1. Collect Seeds: Harvest seeds from mature flower heads in autumn. Dry them thoroughly before storage.
  2. Prepare a Seed Tray: Fill a tray with a light, well-draining seed-starting mix.
  3. Sow the Seeds: Scatter the seeds evenly on the surface and lightly press them into the soil. Do not bury them, as they need light to germinate.
  4. Water Gently: Mist the surface with water to keep it moist without saturating the soil.
  5. Provide Light: Place the tray in a bright location with indirect sunlight.
  6. Maintain Temperature: Keep the tray in a warm environment, around 18–21°C.
  7. Transplant Seedlings: Once seedlings have developed several true leaves, transplant them into individual pots.

Tips for Successful Propagation

Ensure success with these helpful tips:

  • Timing: Perform propagation in late summer or early autumn for cuttings and layering. For seeds, sow them in early spring.
  • Use Sterilised Tools: Clean all tools to prevent the spread of diseases.
  • Monitor Progress: Check cuttings and layered branches regularly for root development.
  • Protect New Plants: Shield young plants from harsh weather until they are well-established.

Propagating Hydrangea aspera is a fulfilling way to expand your garden and enjoy the beauty of this unique plant. Whether you choose cuttings, layering, or seeds, each method has its advantages and challenges. With careful attention and patience, you can successfully grow new plants and enhance your garden with the distinctive charm of rough-leaved hydrangeas.

Winter Protection for Hydrangea aspera

Hydrangea aspera, known for its stunning lacecap flowers and velvety foliage, is a hardy shrub that adds elegance to any garden. However, proper winter care is essential to ensure it remains healthy and resilient. This guide outlines the best practices for protecting your Hydrangea aspera during the colder months, focusing on mulching, pruning, and soil preparation.

The Importance of Mulching

Mulching is a crucial step in safeguarding your hydrangea against harsh winter conditions. A thick layer of mulch insulates the soil and protects the roots from extreme temperature fluctuations.

Benefits of Mulching

  • Insulation: Prevents the soil from freezing, keeping the roots at a stable temperature.
  • Moisture Retention: Reduces water loss, ensuring the roots stay hydrated throughout winter.
  • Weed Suppression: Minimises competition for nutrients and water during the dormant season.
  • Soil Enrichment: Organic mulch breaks down over time, enriching the soil with nutrients essential for spring growth.

How to Mulch

  1. Choose Organic Materials: Use bark chips, straw, or shredded leaves for the best results.
  2. Apply Generously: Spread a 5–8 cm thick layer around the base of the plant, keeping it 5 cm away from the stems to prevent rot.
  3. Refresh Annually: Reapply mulch each autumn to maintain its effectiveness and soil health.

Why Delay Pruning Until Spring?

Pruning Hydrangea aspera in autumn may seem tempting, but it’s best to wait until spring. Leaving the plant intact through winter provides natural protection for its stems and buds.

  • Protects Buds: The old flower heads and stems shield developing buds from frost damage.
  • Reduces Frost Damage: Unpruned stems act as a buffer, allowing the plant to recover more easily in case of frost injury.
  • Encourages Healthy Growth: Spring pruning removes only dead or damaged wood, ensuring the plant’s energy is directed towards new growth.

Tip: When pruning in spring, wait until after the last frost to avoid exposing the plant to sudden cold snaps.

Soil Preparation for Winter

Healthy soil is the foundation of a resilient plant. Preparing the soil before winter strengthens Hydrangea aspera and enhances its ability to withstand cold weather.

1. Add Organic Matter

Incorporate compost, well-rotted manure, or leaf mould into the soil around the plant. These materials improve soil structure, retain moisture, and provide essential nutrients.

2. Balance Nutrients

Ensure the soil contains adequate levels of key nutrients:

  • Phosphorus: Promotes strong root growth and helps the plant store energy for spring.
  • Potassium: Strengthens cell walls and enhances cold tolerance.
  • Calcium: Improves cell structure and protects against frost damage.

3. Ensure Proper Drainage

Avoid waterlogged soil by amending heavy clay with sand or perlite. Good drainage prevents root rot and keeps the plant healthy.

Additional Winter Protection Tips

In addition to mulching and soil preparation, these strategies can help protect your hydrangea during winter:

  • Use Covers: In areas with harsh winters, cover the plant with burlap or horticultural fleece to shield it from frost and wind.
  • Water Before Frost: Deeply water the plant in late autumn to ensure the roots are hydrated before the ground freezes.
  • Protect from Frost Heave: Mulching helps stabilise the soil temperature, preventing the roots from being pushed out of the ground by repeated freezing and thawing.

Common Mistakes to Avoid

Avoid these pitfalls when preparing your Hydrangea aspera for winter:

  • Pruning in Autumn: Cutting back stems too early exposes the plant to frost damage and removes natural insulation.
  • Skipping Mulch: Leaving the soil unprotected increases the risk of root damage from freezing temperatures.
  • Overwatering: Excessive moisture can lead to waterlogged soil, which may cause root rot.

Winter protection is essential for maintaining the health and beauty of Hydrangea aspera. By applying a thick layer of mulch, delaying pruning until spring, and enriching the soil with organic matter and essential nutrients, you can ensure your plant thrives even in the harshest conditions. With these simple yet effective strategies, your hydrangea will emerge strong and ready to flourish in spring.

Preventing and Treating Diseases

Hydrangea aspera, with its velvety foliage and lacecap blooms, is a stunning addition to any garden. However, like all plants, it can be susceptible to various diseases. This article explores common and specific diseases that may affect Hydrangea aspera, along with preventative measures and effective treatments.

Common Diseases of Hydrangea aspera

Understanding potential threats to your hydrangea is essential. Here are the most common diseases:

1. Powdery Mildew

Symptoms: A white, powdery coating on leaves and stems, often leading to leaf curling and reduced plant vitality.

Causes: Warm, humid conditions combined with poor air circulation encourage this fungal disease.

2. Leaf Spot

Symptoms: Brown or black spots appear on the leaves, often surrounded by yellow halos. Severe infections may cause premature leaf drop.

Causes: Fungal pathogens spread via water splash during rain or overhead watering.

3. Root Rot

Symptoms: Yellowing leaves, wilting, and stunted growth. Roots appear dark and mushy.

Causes: Overwatering or poorly draining soil creates the ideal environment for fungal infections.

4. Botrytis Blight (Grey Mould)

Symptoms: Grey mould develops on leaves, stems, or flowers, leading to decay.

Causes: High humidity and damp conditions promote this fungal disease.

Preventative Measures

Prevention is the first line of defence against diseases in Hydrangea aspera. Follow these tips to keep your plant healthy:

1. Ensure Proper Air Circulation

Prune your hydrangea lightly to thin out dense growth. This improves airflow and reduces humidity around the foliage, which discourages fungal growth.

2. Water Wisely

Avoid overhead watering, which can spread fungal spores. Instead, water at the base of the plant early in the day to allow leaves to dry before nightfall.

3. Apply Mulch

Spread a 5–8 cm layer of organic mulch around the base of the plant. Mulch prevents water splashing onto the foliage and helps maintain consistent soil moisture.

4. Maintain Healthy Soil

Enrich the soil with compost to promote a robust root system. Well-draining soil reduces the risk of root rot.

5. Inspect Regularly

Check your hydrangea frequently for early signs of disease. Prompt action can prevent small problems from escalating.
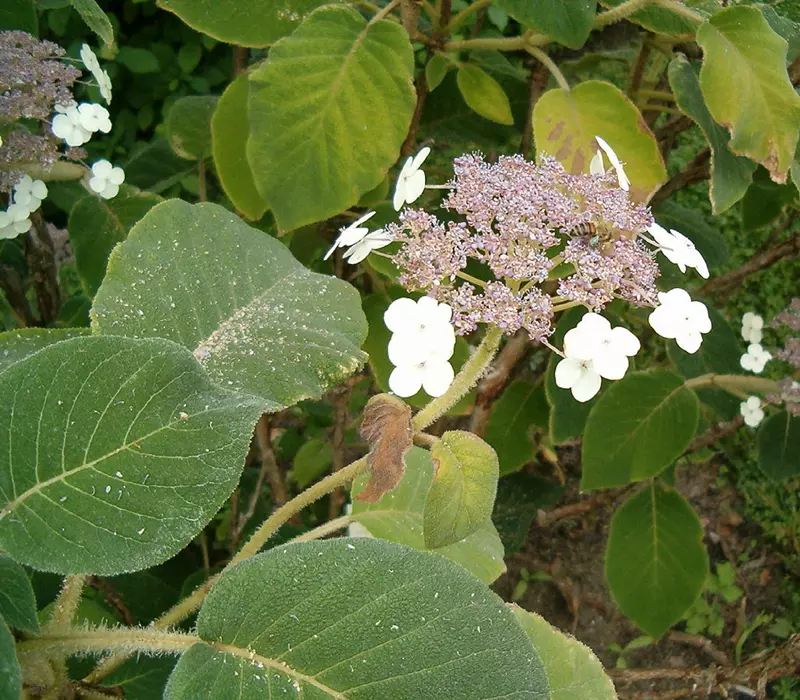
Hydrangea aspera flower and leaves
By User:BotBln - Own work, CC BY-SA 3.0, Link

Treatment Methods

If your hydrangea develops a disease, act quickly to minimise damage. Here are organic and conventional treatment options:

1. Organic Solutions

  • Neem Oil: Mix neem oil with water according to package instructions and spray onto affected areas weekly to control fungal growth.
  • Baking Soda Spray: Combine 1 teaspoon of baking soda, 1 litre of water, and a few drops of liquid soap. Spray on leaves to combat powdery mildew.
  • Compost Tea: Use aerated compost tea as a natural fungicide to improve plant immunity and soil health.
  • Pruning: Remove and dispose of infected leaves and stems to prevent the spread of fungal spores.

2. Conventional Treatments

  • Fungicides: Use copper-based fungicides for powdery mildew and leaf spot. Follow all application instructions carefully.
  • Systemic Treatments: For severe infections, systemic fungicides offer long-lasting protection from within the plant.
  • Soil Drenches: Apply fungicidal soil drenches to combat root rot effectively.

Long-Term Management

To maintain the health of your Hydrangea aspera, adopt these long-term practices:

  • Prune Responsibly: Regularly remove dead or overcrowded stems to promote airflow and reduce the risk of disease.
  • Use Balanced Fertilisers: Avoid over-fertilising, which can stress the plant and increase vulnerability to diseases.
  • Rotate Preventative Measures: Alternate between organic treatments to prevent pathogens from building resistance.
  • Clean Up Debris: Remove fallen leaves and plant debris to reduce the presence of overwintering fungal spores.

While Hydrangea aspera is a hardy and resilient shrub, it can still fall victim to diseases like powdery mildew, leaf spot, and root rot. By focusing on preventative measures such as proper watering, mulching, and regular inspections, you can significantly reduce the risk of disease. If problems arise, prompt treatment using organic or conventional methods will help restore your plant’s health. With consistent care, your hydrangea will thrive and continue to enhance your garden’s beauty.

Eco-Friendly Pest Management

Hydrangea aspera, known for its velvety leaves and striking lacecap flowers, is a resilient addition to any garden. However, pests such as aphids, spider mites, and slugs can pose a challenge to its health. Eco-friendly pest management provides effective solutions that protect your hydrangea without harming beneficial insects or the environment. This guide explores sustainable methods for keeping pests at bay.

Common Pests of Hydrangea aspera

Identifying common pests is the first step in effective management. Below are some pests that may affect your Hydrangea aspera:

1. Aphids

Symptoms: Small, soft-bodied insects cluster on stems and leaves, secreting a sticky substance called honeydew that attracts sooty mould.

Prevention: Encourage natural predators such as ladybirds and lacewings to control aphid populations.

2. Spider Mites

Symptoms: Fine webbing on leaves and stems, accompanied by yellow speckles or leaf drop.

Prevention: Maintain high humidity and regular watering to deter spider mites, which thrive in dry conditions.

3. Slugs and Snails

Symptoms: Large, irregular holes in leaves, especially in damp, shaded areas.

Prevention: Reduce slug habitats by keeping the area around the plant clear of debris and maintaining proper drainage.

Eco-Friendly Pest Management Techniques

Sustainable gardening practices are key to effective pest management. Here are some eco-friendly techniques to protect your hydrangea:

1. Attract Beneficial Insects

Create a garden that supports natural predators like ladybirds, lacewings, and hoverflies. Plant nectar-rich flowers such as marigolds, yarrow, and dill nearby to attract these helpful insects.

2. Use Physical Barriers

  • Slug and Snail Traps: Place shallow dishes of beer near the hydrangea to lure and trap slugs.
  • Copper Tape: Wrap copper tape around pots or beds to deter slugs and snails with its electrical charge.
  • Row Covers: Use lightweight fabric covers to prevent aphids and spider mites from reaching the plant.

3. Apply Organic Sprays

  • Neem Oil: Mix neem oil with water and spray onto leaves to control aphids and spider mites.
  • Soap Solution: Combine 1 tablespoon of liquid soap with 1 litre of water and spray directly on pests for immediate results.
  • Garlic Spray: A homemade garlic-infused water solution repels a variety of pests naturally.

4. Maintain Plant Health

A healthy plant is less susceptible to pest damage. Ensure proper watering, fertilising, and pruning to keep your Hydrangea aspera thriving.

Preventative Measures

Prevention is always better than cure. Adopt these strategies to reduce pest problems:

  • Inspect Regularly: Check your hydrangea for early signs of pests and act promptly to prevent infestations.
  • Clean Debris: Remove fallen leaves and plant debris to eliminate hiding spots for slugs and other pests.
  • Practice Crop Rotation: Avoid planting hydrangeas in the same location year after year to minimise pest buildup.
  • Mulch Wisely: Use organic mulch to improve soil health while avoiding excessive moisture that attracts slugs.

Long-Term Pest Management

Sustainable pest control requires consistent effort and holistic practices:

  • Encourage Biodiversity: A diverse garden with a variety of plants supports a balanced ecosystem that naturally regulates pests.
  • Rotate Treatments: Alternate between organic sprays to prevent pests from developing resistance.
  • Monitor Environmental Conditions: Adjust watering and humidity levels to deter pest-friendly environments.

Eco-friendly pest management is an effective and sustainable way to protect your Hydrangea aspera from common pests. By promoting natural predators, using organic sprays, and maintaining a healthy growing environment, you can keep your hydrangea pest-free while supporting the ecosystem. With consistent care and vigilance, your rough-leaved hydrangea will flourish as a vibrant and healthy feature in your garden.

Companion Planting for Hydrangea aspera

Hydrangea aspera, with its velvety leaves and lacecap flowers, is a striking feature in any garden. Companion planting enhances its beauty and supports a thriving garden ecosystem. This guide explores the best companion plants and how to pair them with Hydrangea aspera for a harmonious landscape.

Benefits of Companion Planting

Companion planting provides aesthetic and practical advantages. Here’s how it benefits your Hydrangea aspera:
  • Enhanced Visual Appeal: Complementary textures and colours create a balanced and attractive design.
  • Pest Control: Certain plants deter pests, reducing the need for chemical interventions.
  • Improved Soil Health: Some companion plants enrich the soil, promoting overall garden vitality.
  • Seasonal Interest: Pairing plants with different bloom times ensures year-round interest.
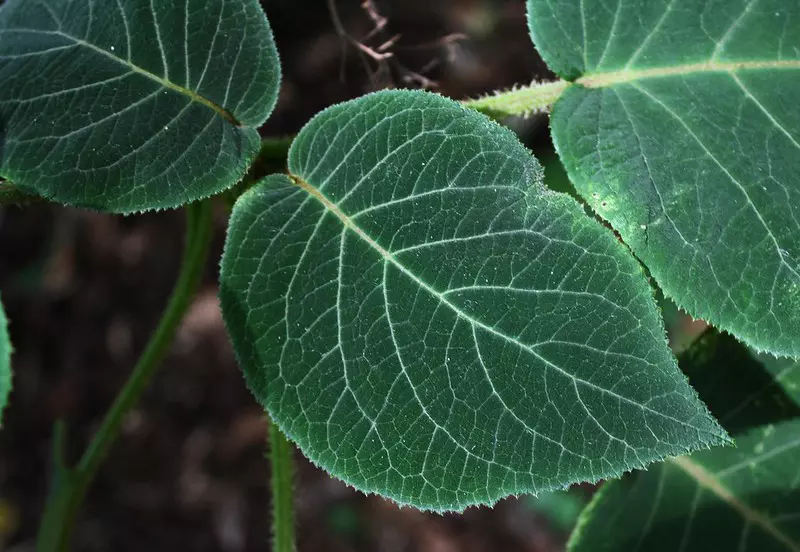
Hydrangea aspera leaves
Source: freepik.com; Author: julia_HalleFotoFan ; License: CC BY-NC-SA 2.0

Best Companion Plants for Hydrangea aspera

The ideal companions share similar growing conditions, such as partial shade and moist, well-draining soil. Consider the following:

1. Shade-Loving Perennials

  • Hostas: Their bold, textured foliage provides a striking contrast to the hydrangea’s delicate leaves.
  • Ferns: The feathery fronds of ferns complement the hydrangea’s broad leaves, adding depth and texture.
  • Astilbes: Their colourful plumes offer vertical interest and thrive in similar soil and light conditions.

2. Ground Covers

  • Sweet Woodruff: Forms a dense, low carpet beneath the hydrangea, adding visual interest and suppressing weeds.
  • Liriope: Its grass-like foliage and purple blooms contrast beautifully with hydrangea flowers.
  • Ajuga: The rich purple foliage of ajuga creates a dramatic contrast, particularly in shaded gardens.

3. Flowering Shrubs

  • Camellias: Their evergreen leaves and early blooms provide winter interest and pair well with the hydrangea’s summer flowers.
  • Azaleas: Early bloomers that offer a burst of colour before the hydrangea begins to flower.
  • Rhododendrons: Their lush foliage and vibrant flowers complement the hydrangea’s delicate blossoms.

4. Spring Bulbs

  • Daffodils: Provide cheerful spring blooms, adding seasonal interest to your hydrangea bed.
  • Tulips: Their bold colours create a vibrant display when planted alongside hydrangeas.
  • Crocuses: Early bloomers that bring life to the garden before the hydrangea awakens.

Design Ideas for Companion Planting

Creative companion planting elevates your garden’s design. Try these ideas to make the most of Hydrangea aspera:

1. Woodland Garden

Combine hydrangeas with ferns, hostas, and wildflowers for a natural, woodland-inspired look. This setup mimics the plant’s native environment.

2. Layered Borders

Place taller shrubs like rhododendrons at the back, hydrangeas in the middle, and ground covers at the front for a visually appealing layered effect.

3. Seasonal Colour Themes

Pair hydrangeas with plants that bloom in different seasons to maintain year-round colour and interest.

4. Container Planting

Use compact hydrangea varieties in containers and surround them with low-growing companions like liriope or ajuga for a cohesive display.

Care Tips for Companion Planting

Proper care ensures all plants in your design thrive together. Follow these tips:

  • Water Consistently: Ensure all plants receive adequate moisture, particularly during dry spells.
  • Fertilise Appropriately: Use a balanced fertiliser to meet the nutritional needs of both hydrangeas and their companions.
  • Prune as Needed: Regularly trim both the hydrangea and its companions to maintain shape and airflow.
  • Monitor for Pests: Check all plants for signs of pests and address issues promptly with eco-friendly solutions.

Companion planting with Hydrangea aspera enhances its natural beauty while supporting a thriving garden ecosystem. By carefully selecting plants that complement its growth habits and aesthetic qualities, you can create a visually stunning and healthy landscape. With proper care and thoughtful design, your hydrangea and its companions will flourish together, bringing year-round joy to your garden.

Hydrangea aspera in Garden Design

Hydrangea aspera, or the rough-leaved hydrangea, is a unique shrub that adds elegance and character to any garden. Its velvety leaves and delicate lacecap flowers make it a standout choice for gardeners seeking to create visually striking landscapes. This guide explores how to incorporate Hydrangea aspera into garden design for optimal aesthetic and functional appeal.
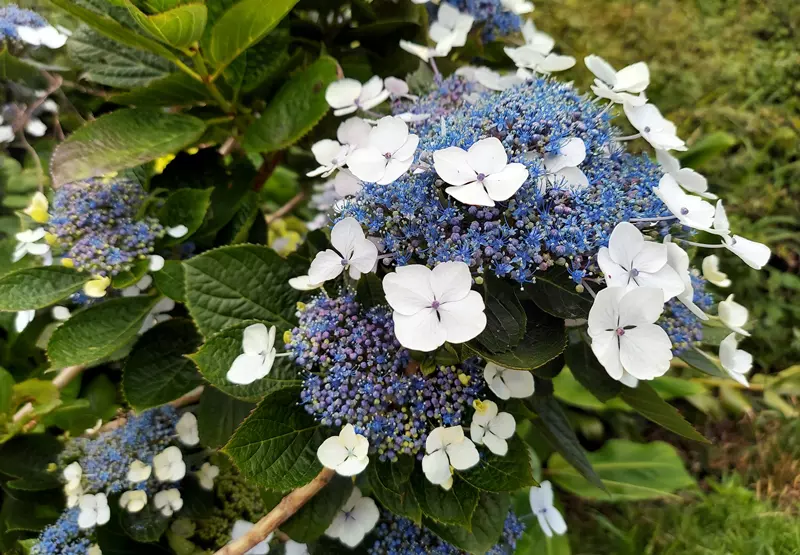
Hydrangea aspera ssp.
By P. Hughes - Own work, CC BY-SA 4.0, Link

Why Choose Hydrangea aspera for Garden Design?

Hydrangea aspera is an excellent choice for garden design due to its unique features and versatility:

  • Distinctive Texture: Its large, velvety leaves and peeling bark add year-round interest.
  • Lacecap Flowers: The delicate blooms provide a soft, romantic feel during summer and early autumn.
  • Shade Tolerance: Thrives in partial to full shade, making it ideal for woodland or shaded garden areas.
  • Seasonal Appeal: Offers vibrant summer blooms and striking winter bark for year-round beauty.
  • Low Maintenance: Requires minimal pruning and care, making it suitable for both novice and experienced gardeners.

Placement in Garden Design

Strategic placement enhances the impact of Hydrangea aspera in your garden. Consider these options:

1. Woodland Gardens

Mimic its native habitat by planting it alongside ferns, hostas, and wildflowers in a shaded or partially shaded woodland setting.

2. Mixed Borders

Place Hydrangea aspera as a middle layer in mixed borders, with taller trees or shrubs behind and ground covers in front for a layered effect.

3. Focal Points

Use it as a focal point in shaded corners or along pathways where its unique texture and flowers can be appreciated up close.

4. Container Planting

Smaller varieties like Hydrangea aspera ‘Sargentiana’ can be grown in large containers for patios or terraces.

Companion Planting

Pairing Hydrangea aspera with the right plants enhances its visual appeal. Here are some ideal companions:

1. Shade-Loving Perennials

  • Ferns: Their feathery foliage contrasts beautifully with the hydrangea’s bold leaves.
  • Astilbes: Add height and colour with their elegant flower plumes.
  • Hostas: Provide a complementary texture and thrive in similar conditions.

2. Ground Covers

  • Sweet Woodruff: Creates a lush carpet around the base of the hydrangea.
  • Liriope: Adds year-round greenery and small flowers in late summer.

3. Flowering Shrubs

  • Rhododendrons: Offer early-season blooms to complement the hydrangea’s later flowers.
  • Camellias: Add winter interest with evergreen foliage and early blooms.

Seasonal Interest

Hydrangea aspera provides year-round beauty:

1. Summer

The large lacecap flowers are the highlight, attracting pollinators and adding a soft, romantic charm.

2. Autumn

The foliage takes on warm hues, creating a vibrant display as the blooms begin to fade.

3. Winter

The peeling bark of mature shrubs adds texture and interest to a winter landscape.

Care Tips for Hydrangea aspera

Proper care ensures your hydrangea thrives and remains a standout feature in your garden:

  • Watering: Keep the soil consistently moist, especially during dry spells, but avoid waterlogging.
  • Mulching: Apply a 5–8 cm layer of mulch to retain moisture and regulate soil temperature.
  • Fertilising: Use a balanced, slow-release fertiliser in early spring to promote healthy growth and blooms.
  • Pruning: Remove dead wood and lightly shape the plant in early spring after the last frost.

Hydrangea aspera is a versatile and elegant shrub that elevates any garden design. Whether used in woodland gardens, as a focal point, or in mixed borders, its unique texture and seasonal interest make it a standout choice. By pairing it with complementary plants and providing proper care, you can create a stunning and harmonious landscape that showcases the beauty of this exceptional hydrangea.

Related articles