Table of Contents
🌿 Step-by-Step: Propagate Hydrangeas from Stem Cuttings
- ✂️ Select a healthy stem: Choose a non-flowering stem from the current season's growth (12-15 cm long).
- 🔪 Prepare the cutting: Cut just below a node, remove the lower leaves, and trim the top leaves in half.
- 🧪 Apply rooting hormone: Dip the cut end in hormone powder or gel to encourage rooting.
- 🪴 Plant the cutting: Insert into moist, well-draining potting mix with at least one node buried.
- 🌫️ Maintain humidity: Cover with a plastic bag or place in a propagator to retain moisture.
- 💡 Provide indirect light: Keep in bright, indirect light at 18-21°C and mist regularly.
- 🌱 Check root growth: After 4-6 weeks, gently tug to test for resistance, indicating rooting.
- 🔁 Acclimatise and transplant: Gradually remove humidity cover and pot into larger containers when roots are strong.
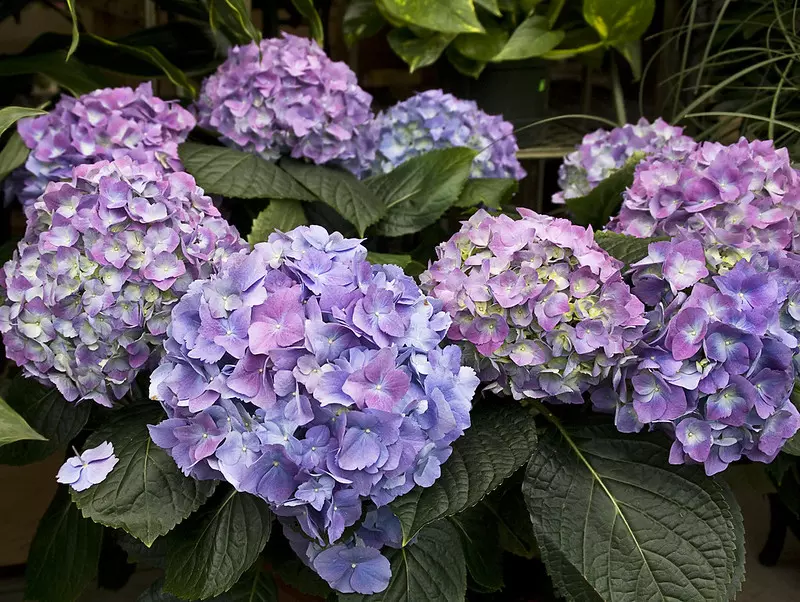
Hydrangeas are beloved for their vibrant blooms and diverse varieties. Propagating hydrangeas allows gardeners to expand their collections and share these beautiful plants with others. This guide explores various propagation methods, providing step-by-step instructions and highlighting the most effective techniques for specific hydrangea species.
 By I, MJJR, CC BY 2.5, Link
Propagation by Stem Cuttings
Propagating hydrangeas through stem cuttings is a rewarding method for expanding your garden or sharing these beautiful plants with others. This technique is particularly effective for species such as Hydrangea macrophylla (Bigleaf Hydrangea) and Hydrangea paniculata (Panicle Hydrangea).
Optimal Timing for Taking Cuttings
The success of hydrangea propagation largely depends on the timing of the cuttings:
- Softwood Cuttings: Taken in late spring to early summer when new growth is still soft and green. These cuttings root quickly and are ideal for most hydrangea species.
- Hardwood Cuttings: Collected in late autumn to early winter from mature, woody stems. This method is less common due to the longer rooting time required.
Materials Needed
- Sharp, sterilised pruning shears or a knife
- Rooting hormone powder or gel
- Small pots or seed trays
- Well-draining potting mix (e.g., a blend of peat moss and perlite)
- Clear plastic bags or a propagator to maintain humidity
- Labels and a pen for identification
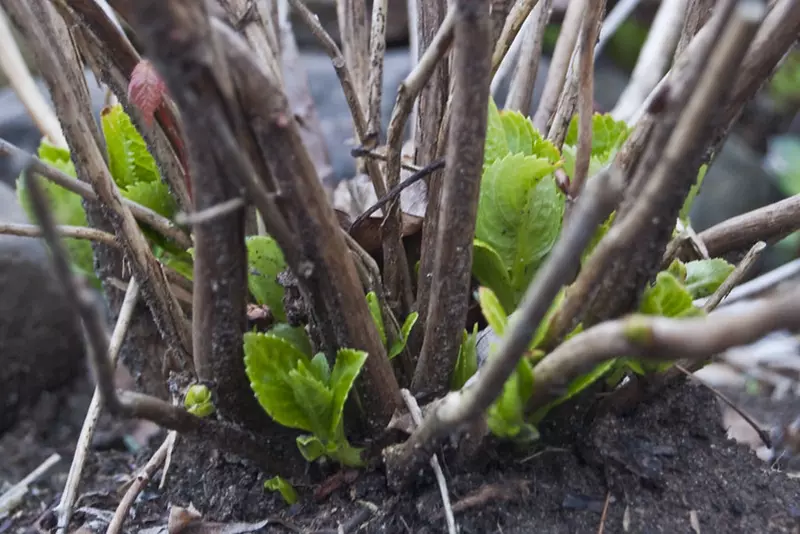
 In my experience, the most viable cuttings come from the spring pruning of hydrangea. When I prune, I carefully select strong, healthy stems and make a clean cut. This ensures that the cuttings have the best chance to root and thrive. As always, I make sure my secateurs are razor-sharp-it truly makes a difference! - Source: hydrangealibrary.com; Author: Richard Seres-Nagy
Step-by-Step Propagation Process
1. Selecting the Cutting
Choose a healthy, non-flowering stem from the current year's growth. The cutting should be approximately 5 to 6 inches (12 to 15 cm) long and include at least three sets of leaves.
2. Preparing the Cutting
- Make the Cut: Using sterilised shears, cut the stem just below a leaf node.
- Remove Lower Leaves: Strip off the bottom pair of leaves to expose the nodes, which will encourage root development.
- Trim Remaining Leaves: Cut the remaining leaves in half to reduce water loss through transpiration.
3. Applying Rooting Hormone
Dip the cut end of the stem into rooting hormone powder or gel, tapping off any excess. This step promotes faster and more reliable root formation.
4. Planting the Cutting
- Prepare the Potting Mix: Fill small pots or seed trays with a well-draining mix of peat moss and perlite.
- Insert the Cutting: Make a hole in the potting mix with a pencil or dibber and insert the cutting, ensuring that at least one node is buried.
- Firm the Soil: Gently press the soil around the base of the cutting to provide support.
Tip - or how I do it: Since it’s crucial to plant cuttings in the same orientation as they grew on the mother plant - base down, tip up - I always use a simple cutting technique. When taking cuttings, I make a slanted cut at the base and, unless they are tip cuttings, a straight cut at the top. This way, I can always tell which end should go into the soil. If the cutting is planted upside down, it won’t root properly!
5. Creating a Humid Environment
Cover the pot or tray with a clear plastic bag or place it in a propagator to maintain high humidity, which is crucial for preventing the cutting from drying out. Ensure the plastic does not touch the leaves by using sticks or wire to create a frame if necessary.
6. Providing Proper Care
- Light: Place the cutting in a location with bright, indirect light. Avoid direct sunlight, which can scorch the tender cutting.
- Temperature: Maintain a consistent temperature between 18-21°C (65-70°F) to encourage rooting.
- Moisture: Keep the potting mix consistently moist but not waterlogged. Check regularly to prevent drying out.
7. Monitoring Root Development
After 4 to 6 weeks, gently tug on the cutting. Resistance indicates that roots have formed. Once well-rooted, acclimatise the new plant to normal humidity levels by gradually removing the plastic cover over several days.
8. Transplanting
When the cutting has established a robust root system, transplant it into a larger pot with standard potting soil. Allow it to grow on for a few months before planting it out into the garden, ensuring it is hardened off to outdoor conditions.
Species-Specific Considerations
While stem cuttings are effective for many hydrangea species, some may require specific considerations:
- Hydrangea macrophylla (Bigleaf Hydrangea): Highly responsive to softwood cuttings taken in early summer.
- Hydrangea paniculata (Panicle Hydrangea): Can be propagated from both softwood and hardwood cuttings, though softwood cuttings tend to root more quickly.
- Hydrangea quercifolia (Oakleaf Hydrangea): Softwood cuttings work well, but ensure high humidity during the rooting process.
- Hydrangea arborescens (Smooth Hydrangea): Softwood cuttings taken in late spring or early summer yield the best results.
Common Challenges and Solutions
Propagating hydrangeas by stem cuttings can occasionally present challenges. Below are common issues and how to address them:
- Wilting Cuttings: Ensure the cuttings are kept in high humidity and avoid direct sunlight. Mist regularly to maintain moisture.
- Rotting Stems: Avoid overwatering and ensure the potting mix is well-draining to prevent waterlogging.
- Slow Root Development: Check the rooting hormone's effectiveness and maintain consistent warmth and humidity levels.
Propagating hydrangeas through stem cuttings is a straightforward and rewarding method to expand your garden or share plants with others. By following the step-by-step process, providing optimal care, and addressing species-specific needs, you can successfully root new hydrangeas. With patience and attention to detail, this propagation technique ensures a thriving collection of these stunning plants.
Propagation by Layering
Propagating hydrangeas through layering is an effective method to expand your garden with new plants. This technique allows a branch to develop roots while still attached to the parent plant, ensuring a higher success rate. Layering is particularly beneficial for species such as Hydrangea quercifolia (Oakleaf Hydrangea) and Hydrangea anomala subsp. petiolaris (Climbing Hydrangea), which naturally produce low-lying branches suitable for this method.
Optimal Timing for Layering
The best time to perform layering is during the growing season, from late spring to early summer. During this period, the plant is actively growing, and the stems are flexible, making them easier to bend and encouraging root development.
Materials Needed
- Sharp, sterilised pruning shears or a knife
- Garden spade or trowel
- Soft ties or landscape pins
- Mulch (optional)
- Rooting hormone (optional)
Step-by-Step Propagation Process
1. Selecting the Branch
Choose a healthy, flexible branch that is low to the ground. The branch should be from the current year's growth and free from any diseases or pests.
2. Preparing the Ground
- Clear the Area: Remove any debris or weeds from the soil where the branch will make contact.
- Loosen the Soil: Use a spade or trowel to loosen the soil, creating a shallow trench approximately 5-10 cm (2-4 inches) deep.
3. Wounding the Branch
Gently bend the selected branch down to the ground. At the point where the branch will touch the soil, make a small wound on the underside by removing a thin strip of bark about 2.5 cm (1 inch) long. This wound exposes the cambium layer, promoting root formation. Applying rooting hormone to the wounded area can further encourage rooting but is optional.
4. Securing the Branch
- Position the Branch: Place the wounded section of the branch into the prepared trench.
- Anchor the Branch: Use soft ties, landscape pins, or a small rock to hold the branch in place, ensuring the wounded area maintains contact with the soil.
- Cover with Soil: Gently cover the wounded section with soil, leaving the tip of the branch exposed. Firm the soil to eliminate air pockets.
- Mulch (Optional): Apply a layer of mulch over the buried section to retain moisture and regulate soil temperature.
5. Caring for the Layered Branch
- Watering: Keep the soil consistently moist but not waterlogged. Regular watering is crucial, especially during dry periods.
- Monitoring: Periodically check the layered branch for signs of root development and ensure it remains securely in place.
6. Severing and Transplanting
After several months, typically by the following spring, roots should have developed at the wounded site. To check, gently dig around the area to inspect for root growth. Once a robust root system has formed:
- Sever the New Plant: Use sharp, sterilised pruning shears to cut the new plant from the parent just below the rooted section.
- Transplanting: Carefully dig up the new plant, preserving as much of the root system as possible. Transplant it to a prepared location in the garden or into a pot with appropriate soil.
- Aftercare: Water the transplanted hydrangea thoroughly and provide shade if necessary to reduce transplant shock. Continue regular watering as the plant establishes itself.
Species-Specific Considerations
While layering is effective for many hydrangea species, some may require specific considerations:
- Hydrangea quercifolia (Oakleaf Hydrangea): Naturally produces low-lying branches, making it ideal for ground layering.
- Hydrangea anomala subsp. petiolaris (Climbing Hydrangea): Its climbing habit allows for easy layering, especially when branches come into contact with the ground.
- Hydrangea macrophylla (Bigleaf Hydrangea): Can be layered, but may require additional care to ensure branches reach the ground.
Common Challenges and Solutions
Propagating hydrangeas by layering can present certain challenges. Below are common issues and their solutions:
- Insufficient Root Development: Ensure the wounded section maintains consistent contact with moist soil. Applying rooting hormone can enhance root formation.
- Branch Detachment: Secure the branch firmly with ties or pins to prevent movement that could disrupt rooting.
- Pest Infestation: Regularly inspect the layered branch for signs of pests or diseases. Treat any infestations promptly using appropriate methods to avoid damage to the developing roots.
- Dry Soil: Ensure the soil covering the layered section remains consistently moist. Mulching can help retain soil moisture and prevent drying out.
Benefits of Layering for Hydrangea Propagation
Layering offers several advantages over other propagation methods:
- High Success Rate: Since the branch remains attached to the parent plant during root development, it continues to receive nutrients and water, increasing the likelihood of successful propagation.
- Low Cost: Layering requires minimal equipment and no additional investment in propagation trays or specialised materials.
- Suitable for Novices: This method is straightforward and ideal for beginner gardeners looking to propagate hydrangeas without advanced skills or tools.
- Minimal Plant Stress: The parent plant is not significantly disturbed during the process, making it a low-risk method for propagation.
Propagating hydrangeas through layering is an effective and reliable method for expanding your collection or sharing plants with others. By following the step-by-step guide, choosing suitable species, and addressing common challenges, gardeners can successfully grow new hydrangeas with minimal effort. This technique not only provides a high success rate but also ensures the health of both the parent plant and the new growth, making it a preferred choice for many enthusiasts.
Propagation by Division
Propagating hydrangeas through division is an effective method to increase your collection or rejuvenate existing plants. This technique involves separating a mature hydrangea into multiple sections, each capable of growing into a new plant. Division is particularly suitable for species that naturally form clumps or have suckering growth habits.
Optimal Timing for Division
The best time to divide hydrangeas is during their dormant period, either in early spring before new growth begins or in late autumn after the leaves have fallen. Dividing during dormancy reduces stress on the plant and allows the divisions to establish roots before the growing season.
Materials Needed
- Sharp spade or garden fork
- Pruning shears
- Watering can or hose
- Compost or well-rotted manure
- Mulch
- Gardening gloves
Step-by-Step Propagation Process
1. Preparing the Plant
Water the hydrangea thoroughly a day before division to ensure the root ball is hydrated, making the process easier and less stressful for the plant.
2. Digging Up the Plant
- Mark the Area: Identify the extent of the root ball by observing the spread of the branches.
- Dig Around the Plant: Using a sharp spade, dig a circle around the plant, about 15-30 cm (6-12 inches) away from the base, to avoid damaging the roots.
- Lift the Plant: Gently lever the plant out of the ground, preserving as much of the root system as possible.
3. Dividing the Root Ball
- Inspect the Roots: Examine the root ball for natural divisions or clumps.
- Separate the Plant: Using a sharp knife or spade, divide the root ball into sections, ensuring each division has at least one healthy shoot and a substantial portion of roots.
- Trim Damaged Roots: Remove any damaged or diseased roots with pruning shears to promote healthy growth.
4. Replanting the Divisions
- Prepare the Planting Holes: Dig holes in the new locations, making them twice as wide and the same depth as the root balls of the divisions.
- Amend the Soil: Incorporate compost or well-rotted manure into the soil to enhance fertility and drainage.
- Plant the Divisions: Place each division into a hole, ensuring the crown is level with the soil surface. Backfill with soil and firm gently to eliminate air pockets.
- Water Thoroughly: Water the newly planted divisions deeply to settle the soil around the roots.
- Apply Mulch: Add a 5-7.5 cm (2-3 inch) layer of mulch around the base of the plants to conserve moisture and regulate soil temperature.
Species-Specific Considerations
While division is effective for many hydrangea species, some may require specific considerations:
- Hydrangea arborescens (Smooth Hydrangea): This species responds well to division due to its clumping growth habit.
- Hydrangea quercifolia (Oakleaf Hydrangea): Can be divided successfully, but handle with care to avoid root damage.
- Hydrangea macrophylla (Bigleaf Hydrangea): Division is possible but less common; consider other propagation methods like cuttings for this species.
Common Challenges and Solutions
Propagating hydrangeas by division can present certain challenges. Below are common issues and their solutions:
- Transplant Shock: Minimise stress by dividing during the dormant season and providing adequate water after replanting.
- Poor Root Development: Ensure each division has a sufficient root system and avoid over-dividing the plant.
- Wilting or Dieback: Protect newly divided plants from extreme weather conditions and maintain consistent soil moisture.
Propagating hydrangeas through division is a practical method to expand your garden or rejuvenate mature plants. By following the step-by-step guide, considering species-specific needs, and addressing common challenges, gardeners can successfully propagate hydrangeas, ensuring healthy and vigorous growth in their gardens.
Propagation by Seeds
Propagating hydrangeas from seeds is a rewarding method for gardeners seeking to cultivate new plants. This approach allows for the growth of unique varieties, as seedlings may exhibit variations from the parent plant. While more time-consuming than other propagation methods, growing hydrangeas from seeds offers the satisfaction of nurturing plants from their earliest stages.
Optimal Timing for Seed Collection and Sowing
The process begins with collecting seeds in the autumn, once the hydrangea flowers have faded and dried on the plant. Sowing can be done immediately after collection or stored in a cool, dry place for planting in early spring. This timing ensures seeds are sown during periods conducive to germination and growth.
Materials Needed
- Brown paper bags for seed collection
- Seed trays or small pots
- Well-draining seed-starting mix
- Clear plastic covers or propagator lids
- Labels and a pen for identification
- Watering can with a fine rose
Step-by-Step Propagation Process
1. Collecting Seeds
In the autumn, select mature hydrangea flowers that have dried on the plant. Cut the flower heads and place them upside down in brown paper bags. Allow them to dry further in a cool, dry location for about a week. Once fully dried, shake the bags to release the tiny seeds from the flower heads.
2. Preparing for Sowing
- Fill Containers: Use seed trays or small pots filled with a well-draining seed-starting mix.
- Moisten the Soil: Lightly water the soil to ensure it is evenly moist but not waterlogged.
3. Sowing the Seeds
Sprinkle the hydrangea seeds evenly over the surface of the moist soil. Do not cover them with soil, as they require light for germination. Gently press the seeds into the soil surface to ensure good contact.
4. Creating a Suitable Environment
- Cover: Place clear plastic covers or propagator lids over the seed trays to maintain humidity.
- Light: Position the trays in a location with bright, indirect light. Avoid direct sunlight, which can overheat the seeds.
- Temperature: Maintain a consistent temperature between 18-21°C (65-70°F) to encourage germination.
5. Caring for Seedlings
- Watering: Keep the soil consistently moist by misting with a fine spray. Avoid overwatering, which can lead to damping-off disease.
- Ventilation: Once seedlings emerge, gradually remove the covers to acclimate them to normal humidity levels.
- Thinning: When seedlings develop two true leaves, thin them to prevent overcrowding, leaving the strongest plants.
6. Transplanting Seedlings
After seedlings have developed several true leaves and are sturdy enough to handle, transplant them into individual pots with a standard potting mix. Continue to grow them in a protected environment until they are large enough to be planted outdoors.
Species-Specific Considerations
While propagating hydrangeas from seeds can be applied to various species, it's important to note that many cultivated varieties are hybrids and may not produce offspring true to the parent plant. Species such as Hydrangea arborescens (Smooth Hydrangea) and Hydrangea paniculata (Panicle Hydrangea) are more likely to produce viable seeds that resemble the parent.
Common Challenges and Solutions
Growing hydrangeas from seeds presents certain challenges. Below are common issues and their solutions:
- Low Germination Rates: Ensure seeds are fresh and have been stored properly. Providing optimal light and temperature conditions can improve germination.
- Seedling Damping-Off: Avoid overwatering and ensure good air circulation to prevent fungal diseases that cause seedlings to collapse.
- Slow Growth: Be patient, as hydrangea seedlings can take time to establish. Providing consistent care and appropriate nutrients will support healthy development.
Propagating hydrangeas from seeds is a fulfilling endeavour that allows gardeners to cultivate new and unique plants. By following the step-by-step guide, considering species-specific factors, and addressing common challenges, you can successfully grow hydrangeas from seeds, adding diversity and beauty to your garden.
Species-Specific Propagation Methods
Hydrangeas are cherished for their diverse blooms and adaptability in gardens. Propagating these plants allows gardeners to expand their collections and share favourites. However, the optimal propagation method can vary among species. This guide explores species-specific techniques to ensure successful cultivation.
Hydrangea macrophylla (Bigleaf Hydrangea)
Propagation by Stem Cuttings
Bigleaf hydrangeas are best propagated through stem cuttings. This method involves taking a 5- to 6-inch-long section from an actively growing stem, removing the lower leaves, dipping the cut end in rooting hormone, and planting it in moist potting soil. The cutting should be kept in indirect light with humidity to encourage root formation.
Considerations
- Timing: Take cuttings in late spring to early summer when the plant is actively growing.
- Environment: Maintain high humidity and indirect light to promote rooting.
Hydrangea arborescens (Smooth Hydrangea)
Propagation by Division
Smooth hydrangeas can be propagated by division. This entails digging up a part of the hydrangea colony with a spade and replanting it in a new location. This method is particularly quick for smooth or oakleaf hydrangeas.
Considerations
- Timing: Perform division in early spring or late autumn during the plant's dormant period.
- Aftercare: Water the new divisions thoroughly and mulch to retain moisture.
Hydrangea quercifolia (Oakleaf Hydrangea)
Propagation by Ground Layering
Oakleaf hydrangeas can be propagated through ground layering. This is done by bending a flexible stem towards the ground, burying a portion in a shallow trench, and waiting for roots to form before cutting it away from the parent plant.
Considerations
- Timing: Initiate layering in spring to allow root development throughout the growing season.
- Monitoring: Check periodically for root formation and ensure the buried section remains moist.
Hydrangea paniculata (Panicle Hydrangea)
Propagation by Stem Cuttings
Panicle hydrangeas can be propagated using stem cuttings. This involves snipping a 5- to 6-inch-long section from an actively growing stem, removing the lower leaves, dipping the cut end in rooting hormone, and planting it in moist potting soil. The cutting should be kept in indirect light with humidity to encourage root formation.
Considerations
- Timing: Take cuttings in late spring to early summer when the plant is actively growing.
- Environment: Maintain high humidity and indirect light to promote rooting.
Hydrangea anomala subsp. petiolaris (Climbing Hydrangea)
Propagation by Ground Layering
Climbing hydrangeas can be propagated through ground layering. This is done by bending a flexible stem towards the ground, burying a portion in a shallow trench, and waiting for roots to form before cutting it away from the parent plant.
Considerations
- Timing: Initiate layering in spring to allow root development throughout the growing season.
- Monitoring: Check periodically for root formation and ensure the buried section remains moist.
Understanding species-specific propagation methods enhances the success rate of cultivating hydrangeas. By selecting the appropriate technique for each species and adhering to best practices, gardeners can enjoy a thriving and diverse hydrangea collection.
Propagating hydrangeas offers gardeners the opportunity to expand their collection and share the beauty of these stunning plants. By selecting the appropriate method for the species and following the step-by-step instructions outlined above, you can achieve successful propagation and enjoy the satisfaction of growing hydrangeas from scratch.
Whether using stem cuttings, layering, division, or seeds, each method has its unique benefits and applications, ensuring that every gardener can find a suitable approach for their hydrangeas.
Frequently Asked Questions (FAQ)
1. When is the best time to take hydrangea cuttings?
The best time to take hydrangea cuttings depends on the type of cutting:
- Softwood cuttings: Late spring to early summer, when new growth is green and flexible.
- Hardwood cuttings: Late autumn to early winter, from mature stems.
2. How long does it take for hydrangea cuttings to root?
Softwood cuttings typically take 4-6 weeks to develop roots, while hardwood cuttings may take several months.
3. Can I propagate hydrangeas in water?
Yes, hydrangea cuttings can root in water, but the success rate is lower compared to using a well-draining soil mix with rooting hormone.
4. What is the easiest hydrangea species to propagate?
Hydrangea macrophylla (Bigleaf Hydrangea) and Hydrangea arborescens (Smooth Hydrangea) are among the easiest to propagate via stem cuttings.
5. How do I prevent cuttings from rotting?
To prevent rotting, use a well-draining potting mix, avoid overwatering, and keep the environment humid but not too wet.
6. When should I transplant my propagated hydrangeas into the garden?
Once the cutting has a strong root system (usually after 2-3 months), you can transplant it into the garden in spring or early autumn.
7. Can all hydrangea species be propagated by layering?
Most hydrangea species can be propagated by layering, but Hydrangea quercifolia (Oakleaf Hydrangea) and Hydrangea anomala subsp. petiolaris (Climbing Hydrangea) respond particularly well to this method.
8. How long does seed propagation take?
Growing hydrangeas from seeds takes the longest—often a year or more—before they reach a size suitable for transplanting.
About the Author

Richard Seres-Nagy is a passionate gardener with over 20 years of experience in hydrangea care. He founded Hydrangea Library to share expert advice, step-by-step guides, and practical tips for fellow gardening enthusiasts.
Read More